Transparent Single Sign-On with CAS & eDirectory

A few months ago I had a patch accepted by the JA-SIG CAS project to enable this single sign-on (SSO) service to automatically authenticate users who are part of an internal Novell network. The benefit of this is that once a user has logged into their corporate network they do not have to authenticate themselves when they use any of the company's web applications. CAS is a good choice for an SSO solution because it is free, fairly simple to setup and has libraries for integrating with Java and just about every other web language. Also, due to its relative simplicity, many popular web applications support CAS 'out of the box', so it pays to do some checking before reinventing the SSO wheel.

How exactly this transparent authentication mechanism works is a little complicated, but in practice it occurs in a fraction of a second without any intervention. Below is a diagram outlining the actions that take place and a brief description of what happens at each step.

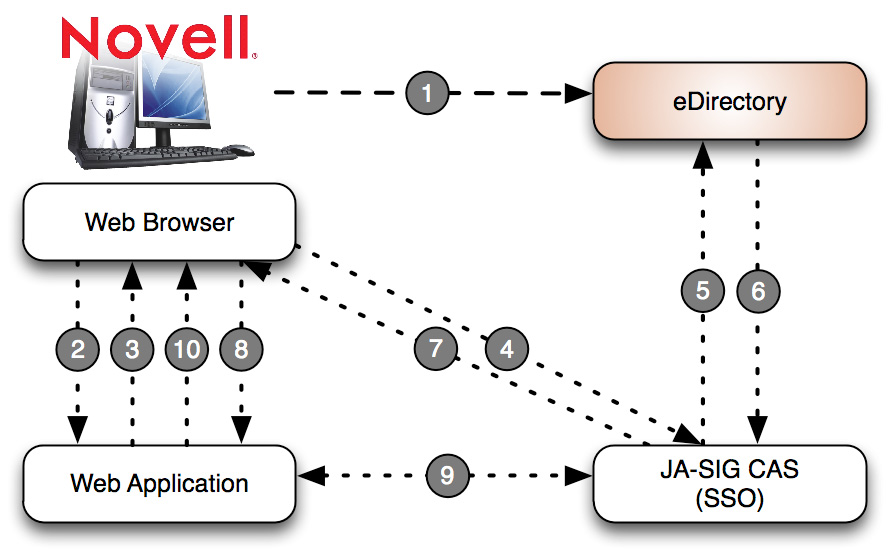
  1. The staff member logs in to the Novell network to gain access to their desktop.
  2. Once logged in the user visits an internally hosted web application. (e.g. CRM, DMS, etc.)
  3. Because the user is not logged in, the web application returns a CAS redirect command to the browser.
  4. The user's browser is automatically redirected to the CAS web service for authentication.
  5. The CAS service detects the incoming I.P. address and performs an LDAP search for this value in the eDirectory.
  6. The LDAP search finds the user's I.P. address and returns their credentials.
  7. CAS creates an authenticated session for the user and returns a one-time use ticket to the browser.
  8. The browser automatically redirects back to the web application and presents the authentication ticket for validation.
  9. The web application checks this ticket against the CAS service. If valid the user's credentials are returned.
  10. The web application creates an authenticated session and returns the relevant HTML content to the browser.

Setting all this up is not too difficult, so long as you carefully follow my instructions on the CAS wiki. The key is understanding what is going on and how the CAS configuration files work to achieve this task. The added bonus is that because this technique uses information stored in eDirectory it works with (pretty much) any Internet browser without any extra client-side software.


A little OSX security tip

The administrator designated user is by default the first user created on an OSX system.
In many cases you probably only have one user on the system and in that case this account will have administrator privileges. Whilst administrator privileges are not complete 'root' privileges it does hold enough power to do serious damage.

Most of the so called OSX 'viruses' are actually trojan horses that are executed by an unsuspecting user. The most famous one was a bash script named like an image file and then given a picture icon (so when the user opened it the malicious script was run).

The easiest way to protect yourself from all of this is to create an admin account with administrator privileges and then take away administrator privileges from your everyday users. This will ensure that even if you accidentally run a trojan or just a malicious application it won't be able to cause any real harm (though it would still be possible to delete all your personal data files). Whenever a system modification is about to take place the authentication box will popup asking for the administrator username/password. This is a nice warning message to you that a system change is going to take place and a deterrent to those users who are not supposed to be making system changes (like kids wanting to install games or p2p clients).

It is a nice security blanket and something Apple should really consider doing by default (but I guess they are more concerned about ease of use). If you ever need true root privileges to edit system details (like files in /etc/) open the Terminal and do the following:

Parallels on OSX and OpenSUSE 10.1 experimenting

I have been trying out SuSE 10.1 on my iMac with the Release Candidate version of Parallels. Parallels is awesome, there is nothing like being able to play with (and blow away) Linux and Windows at almost full speed directly within OSX. On the PowerPC I have used Virtual PC and the Intel iMac has also gone through Bootcamp but Parallels is far and away a better solution for most tasks (you would not want to run games through Parallels).
From a website design perspective it really eases the testing of html/css in all four major environments (Windows Explorer, Firefox, Linux Konquerer and OSX Safari).

One new default feature in OpenSUSE 10.1 that is really very cool is AppArmor. It makes the task of securing server and client based applications simple through the automatic creation of application-based rules (i.e. Firefox can execute these files, modify these files and access these devices). The SUSE Diary has a nicely written tutorial introducing the application and describing how to easily create rulesets.

Bug in SUSE 9.2/9.3 Yast Firewall Scripts

There exists a bug in the Yast firewall scripts for configuring access to a DHCP server. DHCP requires broadcasting capability but the Yast firewall script does not enable this by default. In order to fix the problem ensure the following two directives are set in the /etc/sysconfig/SuSEfirewall2 script:

FW_SERVICES_EXT_UDP="bootps"
FW_ALLOW_FW_BROADCAST="yes bootps"

Setting these two directives will allow the DHCP server to broadcast its availability to the rest of the network without having to lower your server's firewall.

Border Manager with Linux Howto

After some experimenting today I have put together a howto for getting Linux to authenticate to a Border Manager proxy server. If you do not know what that means do not worry but if you do and have tried in the past you maybe very interested to have a read of this tutorial.


Border Manager Authentication with Linux

Getting a Linux server or workstation to work nicely with Novell's Border Manager can be very difficult. Novell have recently brought out a Linux version of their clntrust.exe application for Linux workstations (available in Border Manager 3.8 SP4) but this requires Gnome and the Novell Linux Client. If you are running a server (or use a non-Novell supported Linux distro) meeting these requirements can be difficult. Fortunately there is cl4others which authenticates to the Border Manager through simple command line instructions in a far more flexible manner. Documentation for cl4others is pretty sparse so I have written this little tutorial on how to get it set up and running.

Useful SSH Keygen Guide

This Red Hat document although old concisely explains how to generate and install DSA and RSA keys via SSH. Very handy when you are logging in to a number of different servers for administration purposes.