Over the last week I have been experimenting with SMBLDAP-Tools and some of the new features available in the latest versions of Samba 3. Whilst I've written about setting up a Samba Primary Domain Controller with an LDAP-backend before SMBLDAP-Tools makes configuring this potentially troublesome (but very powerful) combination a lot easier.
For my testing I have been using the Factory build of Samba 3.0.23C for Suse 10. Suse 10 does not have a package for SMBLDAP-Tools but Suse 10.1+ does so I used the 10.1 source package and built it for Suse 10. After a bit of hassle I also applied a patch that fixed Computer creation account problems. If you are using Suse 10.0 the SMBLDAP-Tools package I built can be downloaded from here, otherwise compiling it from source is difficult as its just a collection of Perl scripts.
Configuring SMBLDAP-Tools
The easiest way to configure SMBLDAP-Tools is to run its configuration script at the command prompt:
configure.pl (Enter)
This will ask a range of questions ranging from the authentication details of your LDAP server to the specifics of your user profiles. Once configured it will save the smbldap.conf and smbldap_bind.conf files to the /etc/smbldap-tools directory ready to use.
After tailoring the configuration scripts as root run the smbldap-populate command to generate most of the required LDAP entries. Unfortunately it looks like Samba 3.0.23 expects a few other Domain groups which can be created with the following commands:
smbldap-groupadd -s S-1-5-32-545 -a -g 545 -t builtin "Users" (Enter)
smbldap-groupadd -s S-1-5-32-546 -a -g 546 -t builtin "Guests" (Enter)
smbldap-groupadd -s S-1-5-32-547 -a -g 547 -t builtin "Power Users" (Enter)
To create users use the smbldap-useradd command. The documentation for SMBLDAP-Tools is very comprehensive plus the help provided by the individual commands is very explanatory.
The smb.conf file
With SMBLDAP-Tools in place and configured it is now time to configure Samba. Below is my /etc/samba/smb.conf file. Please note this file has been processed by a Perl script hence all the spaces between configuration options are missing (do not worry Samba does not mind).
[global]
preservecase = yes
bindinterfacesonly = true
nameresolveorder = wins lmhosts bcast
maptoguest = Bad User
printcapname = /dev/null
domainlogons = Yes
disablenetbios = yes
preferredmaster = Yes
strictlocking = no
socketoptions = TCP_NODELAY SO_RCVBUF=8192 SO_SNDBUF=8192 IPTOS_LOWDELAY
printing = bsd
workgroup = STRESSFREE
useclientdriver = no
security = user
domainmaster = Yes
timeserver = yes
ldapadmindn = cn=admin,o=sfs
ldapsuffix = o=sfs
ldapusersuffix = ou=Users
ldapgroupsuffix = ou=Groups
ldapmachinesuffix = ou=Computers
ldapdeletedn = Yes
adduserscript = /usr/sbin/smbldap-useradd -m "%u"
addgroupscript = /usr/sbin/smbldap-groupadd -p "%g"
deleteuserfromgroupscript = /usr/sbin/smbldap-groupmod -x "%u" "%g"
deletegroupscript = /usr/sbin/smbldap-groupdel "%g"
addusertogroupscript = /usr/sbin/smbldap-groupmod -m "%u" "%g"
setprimarygroupscript = /usr/sbin/smbldap-usermod -g "%g" "%u"
addmachinescript = /usr/sbin/smbldap-useradd -w "%u"
deleteuserscript = /usr/sbin/smbldap-userdel "%u"
passwdchat = "Changing password for*\nNew password*" %n\n "*Retype new passw$
passwdprogram = /usr/sbin/smbldap-passwd -u %u
unixpasswordsync = yes
ldappasswdsync = yes
ldaptimeout = 5
loglevel = 0
interfaces = eth0,lo
passdbbackend = ldapsam:ldap://ldap.stress-free.co.nz/
loadprinters = no
winssupport = yes
changesharecommand = /usr/local/sbin/add_delete_share.pl
addsharecommand = /usr/local/sbin/add_delete_share.pl
deletesharecommand = /usr/local/sbin/add_delete_share.pl
serverstring = StressFree file and print server
oslevel = 65
svcctllist = cups apache2 mysql scalix scalix-tomcat dnsmasq smb nmb
## Section - [netlogon]
[netlogon]
browseable = No
comment = Network Logon Service
path = /var/lib/samba/netlogon
writelist = root
## Section - [profiles]
[profiles]
cscpolicy = disable
directorymask = 0700
createmask = 0600
browseable = No
path = /home/profiles
forceuser = %U
guestok = Yes
readonly = no
profileacls = yes
## Section - [music]
[music]
createmask = 664
directorymask = 0775
browseable = yes
writeable = yes
path = /home/music
guestok = no
comment = Music volume
forcegroup = users
## Section - [homes]
[homes]
readonly = No
browseable = No
comment = Home Directories
inheritacls = Yes
validusers = %S
With the above configuration many aspects of Samba can be configured directly within Windows (NT4, 2000, XP) using the srvtools.exe package. To administer these settings you must be logged into the domain as a Domain Administrator. This InformationWeek article talks more about the extended Samba/Windows administration features which turn out to be quite powerful.
In the above example I have configured Windows-based services and shares controlling. Whilst not as powerful as command line access these pieces of functionality are very useful to have in environments where the day-to-day administrator is not competent with a Linux command line.
Note: When setting these things up always remember to checkout the very thorough smb.conf Man file and Samba documentation.
 Manage Linux services from Windows | 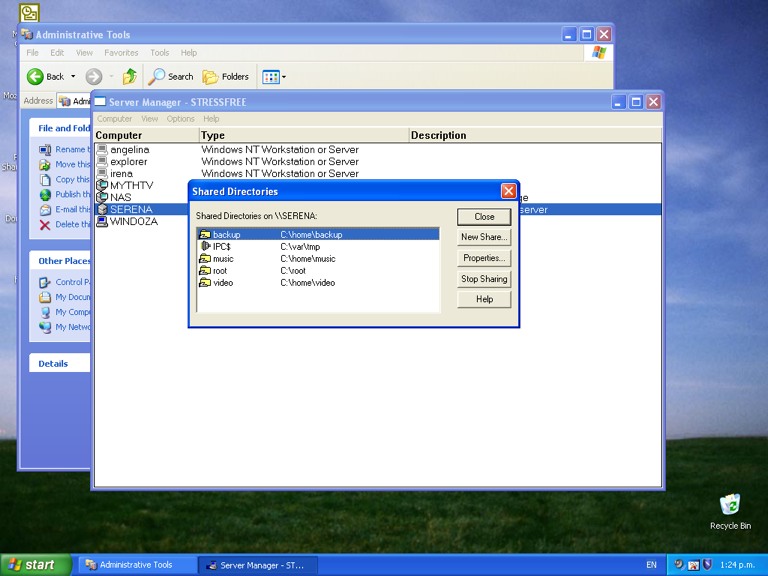 Manage Samba shares from the desktop |
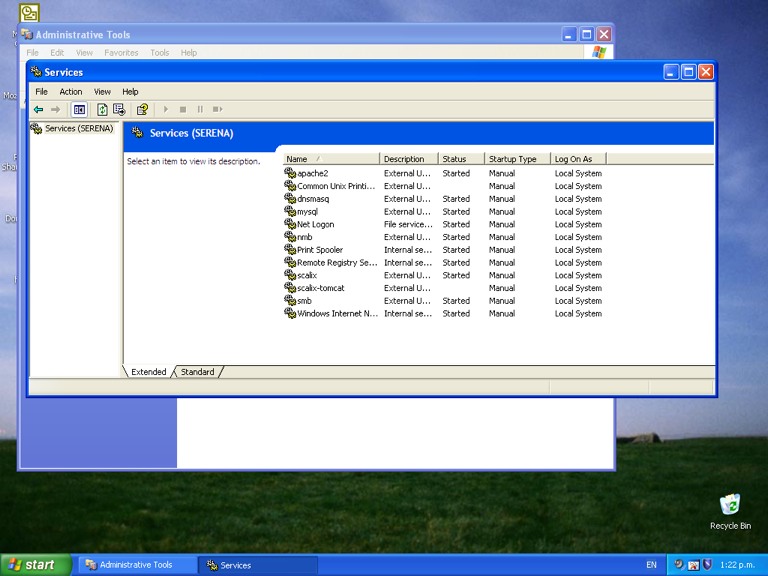
Services Control
The services running on the Linux server can be controlled from Windows via Samba as of version 3.0.21. This functionality integrates into the NT4 Server Manager applet and 2000/XP MMC snap-in. Configuring it is very easy and requires two steps:
1. Create symlinks for the services you wish Samba to be able to control in /usr/lib/samba/svcctl to the service scripts in /etc/init.d. For example to control MySQL from Samba:
ln -s /etc/init.d/mysql /usr/lib/samba/svcctl/mysql
2. Once the symlinks are created to the relevant Linux services edit the /etc/samba/smb.conf file and set the svcctl parameter in the [global] section:
svcctllist = mysql
Restart Samba and now when you browse to the Linux server in Server Manager or MMC and view its services you will see the MySQL service, its status and have the option to start or stop it.
Share Management
NT4 Server Manager allows the directory shares for the server to be manipulated. This task is performed by either a perl or python script found in /usr/share/doc/packages/samba/examples/scripts/shares.
Locate the modify_samba_config.pl file found within the above directory and copy it to /usr/local/sbin. For clarity I also rename it to add_delete_share.pl. I have found that in Samba 3.0.23 this script must be modified in order for things to work correctly, edit the file and find the following lines:
elsif ($#ARGV == 3) {
$add_mode = 1;
}
and change it to read (change the 3 to a 4):
elsif ($#ARGV == 4) {
$add_mode = 1;
}
Now edit the /etc/samba/smb.conf file and add the following configuration options:
changesharecommand = /usr/local/sbin/add_delete_share.pl
addsharecommand = /usr/local/sbin/add_delete_share.pl
deletesharecommand = /usr/local/sbin/add_delete_share.pl
Restart Samba and you should find the shares on the server can be modified as required. Do note however that this script is not very advanced and does not provide advanced privileges support, it only creates basic shares. Also be aware that when using the Server Management tool the path to shared directories must be entered in a Windows centric format, for example c:\home\david for /home/david.