USB devices with VMWare Server 2.0 on Ubuntu

One of the nice features of VMWare Server 2.0 is that it supports the forwarding of USB devices to virtual machines. Unfortunately when it comes to Linux the VMWare team have leveraged an old method (/proc/bus/usb) for scanning the USB bus which newer distributions, such as Ubuntu Server 8.04 no longer support.

To resolve this problem the "old" method for scanning for USB devices must be enabled in the underlying operating system. In the case of Ubuntu Server 8.04 this is a case of editing the file /etc/init.d/mountdevsubfs.sh and uncommenting the following section:

#
# Magic to make /proc/bus/usb work
#
mkdir -p /dev/bus/usb/.usbfs
domount usbfs "" /dev/bus/usb/.usbfs -obusmode=0700,devmode=0600,listmode=0644
ln -s .usbfs/devices /dev/bus/usb/devices
mount --rbind /dev/bus/usb /proc/bus/usb

Reboot the server and /proc/bus/usb should be functional once more.

Activating a USB device within a virtual machine

Once the underlying USB subsystem is configured the USB device needs to be associated with a virtual machine. For this to occur the virtual machine must have the USB Controller added to its virtual hardware configuration. If the controller is not already part of the virtual machine's configuration shutdown the VM, add the device and restart.

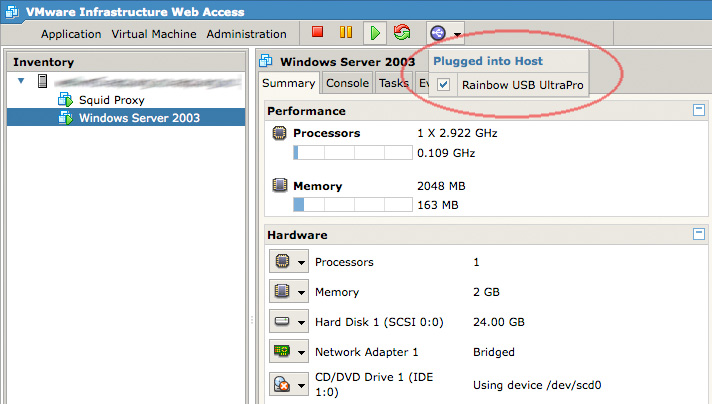
Assuming there are USB devices attached to the server, once the virtual machine boots a small USB icon will appear within the VMWare web management console. Click on the icon and select the relevant USB device to attach it to the running virtual machine.

All going well the USB device will appear within the virtual machine as an accessible device. VMWare Server remembers this selection, so the next time the virtual machine (or server itself) is restarted the USB device will automatically be attached to the running VM.

VMWare Server 2.0 optimisations

VMWare Server 2.0 is emerging as a capable, zero cost alternative to VMWare ESX when used in combination with Ubuntu Server 8.04LTS. Unfortunately "out of the box" performance can be a little disappointing, especially when running guest Windows virtual machines. What follows are a few system tweaks that can improve performance without hampering overall system stability. I have not come up with these myself, instead they are pruned from the following pages:

Kernel parameters

In addition to the default Ubuntu Server kernel parameters, the following should be appended to the end of /etc/sysctl.conf.

vm.swappiness=0
vm.overcommit_memory=1
vm.dirty_background_ratio=5
vm.dirty_ratio=10
vm.dirty_expire_centisecs=1000
dev.rtc.max-user-freq=1024

Once added reboot the server to ensure their application is successful and permanent.

Create an in-memory temp drive

In the host's /tmp directory create a new directory named vmware (e.g. /tmp/vmware). This will be used as the mount point for a tmpfs (in-memory) partition for storing VM related, temporary files.

Edit /etc/fstab and add the /tmp/vmware partition to your list of mount points:

tmpfs /tmp/vmware tmpfs defaults,size=100% 0 0

Now if you execute the following command the tmpfs filesystem will be mounted at /tmp/vmware:

sudo mount /tmp/vmware

If successful, reboot the Ubuntu server to ensure the tmpfs partition is mounted at boot time.

VMWare Server configuration

Edit the /etc/vmware/config file and ensure the following configuration declarations are set:

prefvmx.minVmMemPct = "100"
prefvmx.useRecommendedLockedMemSize = "TRUE"
mainMem.partialLazySave = "TRUE"
mainMem.partialLazyRestore = "TRUE"
tmpDirectory = "/tmp/vmware"
mainMem.useNamedFile = "FALSE"
sched.mem.pshare.enable = "FALSE"
MemTrimRate = "0"
MemAllowAutoScaleDown = "FALSE"

These configuration declarations instruct VMWare Server to keep all virtual machines in memory and not to write unused blocks to disk. It also sets the temporary directory to the newly created tmpfs partition at /tmp/vmware.
Restart the VMWare Server process (sudo /etc/init.d/vmware restart) or reboot the server for these changes to take effect. The net result should be notably smoother virtual machine performance, especially when it comes to Windows guests.

Virtual machine tips

  • Always use fully allocated disk images.
  • Do not use snapshots as they are approximately 20% slower.
  • Always install the VMWare Tools package.
  • If running Linux make sure the kernel is compiled for running within a VM, or is using the correct boot time parameters.


Remotely managing VMWare servers via SSH

As the cornerstone of any company's server infrastructure it is extremely rare to find VMWare servers (be they Server, ESX or ESXi) directly exposed the the Internet. Generally these important services are hidden behind layers of protection which can make managing them when not onsite quite a challenge. Of course you could setup a VPN or use some remote desktop access software, but why bother when plain old SSH can do the job for you.

Once you have SSH access to a system within the organisation's network it is a fairly simple task to create virtual tunnels to the VMWare servers. This is a secure way to manage the devices because all traffic goes through an encrypted tunnel and beyond the SSH service itself you are not interacting with any other internal services.

Remote VMWare server access requires two SSH tunnels, an HTTPS tunnel (typically port 443) and a console tunnel (typically port 902). Below is a small script that you can use to create these tunnels from Linux, OSX or any other *NIX operating system.

Copy and paste the following text into a file named vmware-manage.sh:

#! /bin/sh

# The local I.P. address for the tunnel endpoint
LOCAL_IP=192.168.1.1

# The SSH connection details
SSH_USER=sshuser
SSH_HOST=ssh.host.com
SSH_PORT=62222

# VMWare server configuration
VMWARE_IP=$2
VMWARE_WEB_PORT=443
VMWARE_CONSOLE_PORT=902

echo "Managing VMWare server at $VMWARE_IP"
echo "Accessible via $LOCAL_IP:$VMWARE_WEB_PORT"
echo "Press CTRL+C to close"

case "$1" in
console)
sudo ssh -N -L $LOCAL_IP:$VMWARE_CONSOLE_PORT:$VMWARE_IP:$VMWARE_CONSOLE_PORT $SSH_USER@$SSH_HOST -p $SSH_PORT
;;
web)
sudo ssh -N -L $LOCAL_IP:$VMWARE_WEB_PORT:$VMWARE_IP:$VMWARE_WEB_PORT $SSH_USER@$SSH_HOST -p $SSH_PORT
;;
esac

At the top of the file edit the LOCAL_IP, SSH_USER, SSH_HOST and SSH_PORT variables to suit your specific setup.

  • LOCAL_IP - Typically your desktop's I.P. address (or 127.0.0.1).
  • SSH_USER - The SSH user account to log in with.
  • SSH_HOST - The hostname with the accessible SSH service.
  • SSH_PORT - The port SSH is running on. For security run SSH on a non-standard port if facing the Internet (i.e. not 22).

Now flag this file as being executable:

chmod a+x vmware-manage.sh

To manage a VMWare server with an internal I.P. address of 10.1.1.5 run the following command:

./vmware-manage.sh web 10.1.1.5

You will be prompted for your local password (for sudo access) and the SSH password.

Once created open a second console and create the second tunnel for console access:

./vmware-manage.sh console 10.1.1.5

You should no be able to access your VMWare server at https://192.168.1.1 (i.e. the LOCAL_IP address value). Or if you are using the VI Client enter 192.168.1.1 as the server address.

Once you have finished managing your system you can close the tunnels by pressing CTRL+C.


VMWare Server 2 finally goes gold

On September 23 after a year of public development VMWare Server 2.0 was officially released. Server is VMWare's free, entry-level, server-centric hypervisor. Unlike VMWare's other server virtualisation products ESX and ESXi, Server must be pre-installed onto a host operating system (Windows or Linux). This adds a management and performance overhead, which for some is incentive enough to choose VMWare's more costlier offerings (or explore Xen). However if you are looking to easily virtualise a handful of servers and do not mind a small performance hit, VMWare Server is a great place to begin.

In comparison to VMWare Server 1 (a.k.a GSX) this new release appears to be a complete rewrite. However when first announced the new version received a mixed response as many existing users viewed it as slow, bloated and buggy compared to its predecessor. Ignoring the bugs which come with any beta-quality code, the majority of this criticism fell into two areas: the new web-based management console and a 500MB+ download (up from ~100MB).

Web-centric virtualisation management

Without a doubt the most controversial aspect of VMWare Server 2 is its focus on a web-based management console. In the previous release management was primarily conducted through a Windows-only client with a token web interface provided to view what was running. This new interface enables all of the hypervisor's functionality to be managed and monitored from any modern, Javascript-enabled browser. The only cavet being that virtual machine console access requires an ActiveX or Firefox extension (Windows/Linux only). Process-wise this is a little disjointed as a browser restart is needed when this extension is first installed. Whilst not a major problem this two-step process does take the shine from being able to manage your virtual infrastructure from 'any' computer.

As an aside given the variety of Java-based SSH, VNC and remote client applets it is a little surprising to see VMWare go the ActiveX/Firefox extension route. Whilst I have not tried the ActiveX control, the Firefox extension is large and feels sluggish when running in both Windows and Linux. Still the ability to setup and manage VMWare from something other than Windows is a definite bonus. However as an OSX user it would be nice to see VMWare management support on this platform as well.

Installing VMWare Server 1.0 on Ubuntu 6.06LTS

Ubuntu 6.06LTS is a useful platform for VMWare because it has a small footprint by todays standards and is supported by Canonical until 2011. Unfortunately installing VMWare Server 1.0 can be a little painful given there are no binary kernel modules for Ubuntu in this release.

Fortunately there are some excellent guides for installing VMWare on this platform such as this one from HowtoForge. What follows is an installation script based on the HowtoForge guide that saves the administrator a lot of time and solves a bug along the way.

Parallels update brings Windows CAD to the OSX desktop

Parallels released an update today for their Parallels Desktop for Mac virtualisation software which introduced 'coherence' mode and seriously improved video drivers capable of supporting DirectX. To give the new features a test drive I installed Autodesk Design Review, Revit 9.1 (trial version) and Bentley View on the virtual instance of Windows XP and had a play. All performed very well even with minimal RAM allocated for testing purposes. Quite possibly the only let down was that before you could start using the software the virtual machine first had to load Windows.

The screencast above illustrates the boot process, coherence mode, Design Review and Revit in action. The screencast was taken at a fairly low frame rate and YouTube just makes it all that worse. Please take my word for it that performance on a 1.83 Intel Core Duo iMac was fairly snappy even with only 256meg of RAM assigned to the VM. In a production environment you would certainly want to allocate at least 512meg of RAM to Parallels which would mean needing between 1.5/2gig of RAM in the Mac.

Whilst I would hardly recommend to architects that they should use their primary productivity application in a virtualised window, from the perspective of those Mac users who need to occasionally use a piece of Windows only software this level of functionality and performance from Parallels is perfect. Sure it is not nearly as quick as running natively, but then you don't have instant access to all of OSX's niceties that you begin to miss once forced to work on a Windows desktop for a little while.

XenExpress - the fast lane of Xen virtualisation

The open source Xen virtualisation suite has caused a bit of a stir within the Linux world because it combines the power of VMWare without the proprietary code and cost hassles. Unfortunately Xen is not the most user friendly thing in the world to setup or configure. For a large organisation this is not so much of a problem because they can afford to hire expensive consultants or train their in-house staff. For smaller players or individuals interested in the concept but unwilling to invest hours into training XenSource have released XenExpress.

XenExpress fits on a single CD and can be downloaded without charge from the XenSource website (they do however ask for a few contact details). To setup your very own Xen host you just boot the computer from the CD, answer a few configuration questions like time and network setup and then just sit back and watch as XenExpress turns your computer into a fully functional Xen platform (for further instructions checkout this howto). After installation is complete configuration of the Xen host occurs remotely via a Java desktop application that runs on Windows, Linux or after a little hacking OSX. Most of the basic Xen tasks like virtual instance management and system maintenance can be accomplished through the interface without much effort or reference to the user guide. If you are an advanced user you can also bring up a terminal on the Xen host and run your normal Linux commands as at its heart XenExpress appears to be a slimmed down Red Hat distribution.

Parallels on OSX and OpenSUSE 10.1 experimenting

I have been trying out SuSE 10.1 on my iMac with the Release Candidate version of Parallels. Parallels is awesome, there is nothing like being able to play with (and blow away) Linux and Windows at almost full speed directly within OSX. On the PowerPC I have used Virtual PC and the Intel iMac has also gone through Bootcamp but Parallels is far and away a better solution for most tasks (you would not want to run games through Parallels).
From a website design perspective it really eases the testing of html/css in all four major environments (Windows Explorer, Firefox, Linux Konquerer and OSX Safari).

One new default feature in OpenSUSE 10.1 that is really very cool is AppArmor. It makes the task of securing server and client based applications simple through the automatic creation of application-based rules (i.e. Firefox can execute these files, modify these files and access these devices). The SUSE Diary has a nicely written tutorial introducing the application and describing how to easily create rulesets.

The Art of Xen

xen.png
In order to install Zimbra without issues I had to setup Xen on my server. This was actually a good thing because I had been thinking of doing so for a while after experimenting with it last year.

Setting up Xen on OpenSUSE is relatively straightforward if you follow the Xen howto on the Wiki: http://en.opensuse.org/Installing_Xen3